Monday, March 3, 2014

Rubik's Photo Collage

I am actually poaching this next project from my mother-in-law. She made one of these for all of us at Christmas and they are just so amazing that I had to share.

The best part is that I almost always see a Rubik's Cube on the toy aisle of Restore for no more than $ 2. Not to mention that you can also pick up a cooling rack or drying tray that you will need for this project while you are there for as little as $. 50 each. And I have been able to snag a good deal on photo paper on occasion.  I really wouldn't be shocked if I found the resin needed on the craft aisle either. So stop by your local Restore and see how very inexpensive this project can be.


What you will need :
2 part clear resin
Rubik's Cube
Photo paper
A cookie cooling rack (or doaming tray found at craft store )
Disposable plastic cup
Plastic spoons
Super glue


1. Remove the existing stickers from cube. There are many different ways to accomplish this from using goo-gone to mayonnaise.

2. Choose your photos. Since this was a surprise, my mother-in-law pilfered pictures from our Facebook Albums. The quantity and size of pictures you will need depends on the amount of cubes. This one had 4 on each side and a total of 24 pictures were needed. A standard rubik's cube will have 9 cubes per side and a total of 54 pictures will be needed. I found this website that offers a free template download for the 4 block cube and a they also offer a download for the 9 cube as well.

3. Cut your pictures and lay out on doaming tray about an inch apart. (This site actually provides a very detailed 2 part instructional video for this project as well)

3. Mix your resin according to directions on label. Take time and read about avoiding bubbles and how to get the bubbles out of your mix.

4. Spoon out about half a spoon full of resin and place the tip of the spoon over the center of the picture and let the resin run off. Once you have covered all the photos, get down to eye level and see if you need to add a few drops to any photos that are not perfectly covered.

5. Place dust cover over your tray and wait 10 mins. After the 10 minutes have passed, remove the cover and check for bubbles that may have rose to the surface. Either use the spoon tip or a toothpick to carefully remove the bubbles without scooping away the resin.

6. Replace dust cover and let dry for the amount of time listed on the resin instructions.

7. Glue your photos to the blocks. 

8. Proudly display your crafty work of genius or wow and amaze someone with a very special gift.

Tuesday, February 11, 2014

This Guest Bloggers Knows Paint!

Hello Reclaimers! I am Karen Adams and a new blogger for My [Re]claimed Home! I thought I would share a little about myself and then go onto giving you some tips and tricks that you can use on your own projects.

First things first, who am I. Well I started my reclaiming, dumpster diving, garage sale picking, Restore shopping fetish about 10 years ago. I have always been blessed with a great artistic ability -being able to paint, draw, sculpt and much more, however after high school and a semester of college I wanted to do even more than the average artist. I wanted to use my talent in a unique way but I wasn’t sure how. Unbeknownst to me the answer was about to present itself in a very innocent way.

My mother-in-law was having a garage sale and had a tired old baker’s rack that she thought would sell if it just had a little coat of paint. So I took on the challenge! I painted the rack and added some design flair to it and before I knew it a light bulb went off. I wanted to do this! I wanted to redo furniture, make it one of a kind and wow people. And of course it didn’t stop there. I not only redo furniture but I also create new furniture and items out of … for a lack of a better word… “Junk”

I LOVE what I do with a passion! I take great pride in my work and love to share my talents with the world. I teach people how to get past their project dilemmas and how to look at items in a new light (I also started Pink Punk Design on Facebook with my Mother in-law, Laurie Hamilton, for anyone who is interested in getting tips and tricks on a whole wide range of topics)

OK so enough about me! Let’s talk PAINT!

Not just any paint but the up and rising popular chalk paint!

This diverse eco-friendly paint is so easy to use! Add a little water to it to make it smooth, thicken it up by leaving the lid off, and make it into a wash by adding even more water. Use flat brushes for a smooth look or bristle brushes for a more textured aged look. It is so simple and diverse! It covers most surfaces with little to no priming at all. I encourage everyone who paints to have this in their arsenal! 

Now you may be asking yourself, this is great but where do I get it? Well the more popular brands such as Annie Sloan, CeCe Caldwell, American Paint co, FAT paint, Maison Blanche, Van Gough, and Shabby Paint (just to name a few) are great but they can cost anywhere from $29.99 - $38.95 per Quart!

This is just out ragout in my opinion especially since you can make your own for about $5.00!


This is what you will need:

(I normally go to Lowes or Home Depot)

*      Color sample pots in your color choice – Must be Latex based (Valspar is my go to brand $2.98 each)


*      White Plaster of Paris (this will last you a LONG time so it’s a great investment) $6.48 @ Lowes

*      Furniture wax $9.97 @ Lowes ** (optional, but recommended)

Now Mix:

1/2 cup of Plaster of Paris with a 1/2 cup of warm water until it dissolves. Once its dissolved, add 1 1/2 cups of latex paint (the whole container if your sample color is Valspar)

How to use:

Paint like you normally would! If you want it thicker, let it sit out a while. If you want it as a wash, add more water, or just use it as it is after you mix it. Also you may or may not need two coats. See how the first coat goes and use your best judgment depending on what look you are going for. 


Tips:

·         You will want to wax your project to protect the surface from chips and wear and tear. This step is not required but is highly recommended.

·         For a more textured look switch out the plaster of Paris with white non-sanded grout.

·         Don’t forget to sand for a smooth finish look


Monday, February 3, 2014

Puzzling Sideboard

My mother called me the other day after attending a meeting with the art guild she is a member of with a cute puzzle to see if you have an "artistic mind." The equation is:

2+2= fish
3+3= eight
7+7= triangle

I got it. If the answer isn't as clear for you, I will share at the end of this next Restyle story.
The answer to the test above reminded me about the sideboard buffet table I had made for the 2013 Restore Restyle Event. This one did require the obsessive compulsive disorder or perfectionism that only my husband can add to any project. So where I may have been the brain power behind the concept and design behind the materials to be used, and after 3 days of thoroughly explaining to him exactly how a bed canopy, a wood door, 2 cabinet doors, 8 hardwood floor strips, and some granite tiles were going to come together, his craftsmanship is what made it come to life.

I wasn't exactly sure what they were until I got home later that day, all I knew was that I loved the detail of it and there was plenty of it to use in a project. It turned out to be the rails to turn a poster bed into a canopy bed.
My next challenge was to find a wood door that would match the rails and looked exactly like what I had pictured in my mind. (turns out it wasn't that big of a challenge, it was on the first aisle among the vast selection of varieties of doors and was $40)

I picked up the cabinet doors for $4 each. And the granite tile was $2 a piece.

First we figured out exactly where we would have to cut the door so that the hole of the door knob could be concealed. Then we laid out the rails and started work on rearranging them like a puzzle so that we could utilize their hardware and cut to keep the beautiful lines and pattern in tact.

After that, it pretty much came together in a snap. We built the frame and attached the cut door with screws to the back. We placed the cabinet doors on the top and the bottom. We used a bit of scrap plywood to build up the top to make it level with the frame. Then cut the granite tiles for the top. The bottom was finished with hardwood floor planks.


Once the grout dried for the granite. We glued a bit of trim from the hardware store ($3) that we stained, to add detail around the tile and make it flow into the wood around it. (By the way, Restore did have that trim in stock as well, but unfortunately it was Sunday, they were closed and I was on a deadline)


TAHDAH! A beautiful handcrafted sideboard buffet table that my husband REALLY hated to send away to be sold, he loved it so much.


I did tell him that he finished it too well and I don't think people could tell that we made it until they looked very closely. And in case you are wondering, That is an iron gate hung on the wall behind it I picked up at Restore for the challenge as well. It now has a wonderful home in my herb garden.

Now the answer to the puzzle:
2+2= fish 
Think about the Christian fish symbol you see on car bumpers, now think about flipping the 2's on their side and flipping one to mirror the other and bring them together... it makes a fish!
3+3=eight
Now that you get where this is going I don't think 8 needs much more explaining.
7+7= triangle
Flip your 7's upside down and flip one to mirror the other, bring them together and you get a triangle shape.

Monday, January 27, 2014

Picture Perfect Table

Picture Frame Table

During a visit the other day with a neighbor, I sat down at her kitchen table and realized that it had been the table that I had made for the Restore Restyle Designer Challenge that she had bought the night of the event. Seeing it again and talking about how it came to be, I thought I should share that process.

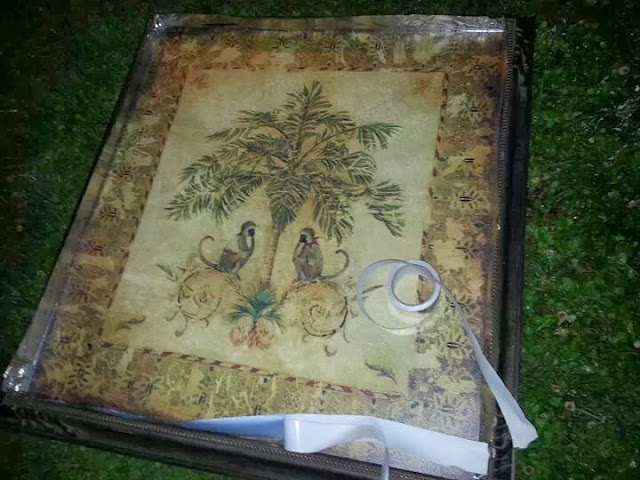
I had came across this giant framed picture at the Restore in Mooresville. Though I wasn't in love with the picture inside, I was in love with the frame and all of it's details and it's perfect square size. 
I started by taping off the inside of the frame and spray painting with my favorite color of primer, silver metallic. I highly recommend using this as a primer for everything. It seems to coat evenly, concealing everything and adheres well to finished surfaces virtually eliminating the need for sanding. I also find that it makes your top coat a more truer color that is brighter and with a more multi-tone effect as a result of how the light reflects off the metallics. After allowing the primer to dry, I then painted my top coat and allowed to dry. Then sealed the frame to the picture with clear silicone caulking. I covered the picture part and painted the outside of the frame.
Next step was cutting up the this cardboard of old Christmas gift boxes into my flower petals. I laid the petals out in a three circles, decreasing the size of the center with each ring. I sprayed each ring with spray adhesive,  ensuring that each petal was fully coated and then used colored tissue paper that I had wrinkled up and placed it on the cardboard. I used red, yellow and orange tissue paper, placing the red and orange on first and then sprayed more adhesive and placed the yellow at the inner part of the ring to give the flower more dimension. With the tissue paper in placed, I stacked the layers on top of each other and I used yellow and orange and coral/red spray paint to lightly mist the flower to blend all the colors together of the paint and tissue.


I used the metal grate of a commercial drop ceiling HVAC vent and cut it into 4 even squares and spray painted them green.


For the legs, I used 4 stair spindles nailed together I got from Restore ($2 each) for each leg and painted them black. I screwed the legs to the bottom of a small pallet I  then  nailed/glued the the picture down to it. For extra detail and to make the table appear more complete, I used 4 copper plumbing caps ($.50 each) and used a hole saw on the bottom of one of the 4 spindles for each leg and hammered the cap into the hole.


With the base of of the table now complete, I glued/screwed the picture to the top of the pallet. I sealed any holes that were made with the silicone caulk. I arranged the metal square in the corner and glued them down. Then I placed my flower into the center with glue and nailed a decorative paperclip with a upholstery brad in the center of the flower.
I decided to use an epoxy countertop mix to create a hard cleanable surface. Following the directions on the bow for the mix, I poured it inside of the frame and waited for it to dry.
I used base moulding from Restore to cover the visible part of the pallet under the frame and painted it.

The mystery challenge item that we had to incorporate into our room design was an electrical light switch plate. I painted 8 with copper leafing paint and attached them to each far corner onto the base moulding around the table. I then took metal necklace charms and snapped off the ring on top where the charm would hang from a chain and glued them to the center of each switch plate.


Once the epoxy had thoroughly dried, I placed a piece of plexiglass from Restore cut to size on top and sealed it to the frame with the silicone caulk.

This was one of my favorite pieces of the room. The final cost to create this one of a kind table was $75 and 2 days of work. I couldn't be happier with the final result and my neighbor loves having what she refers to it as "functional art" and conversation piece.


Wednesday, January 1, 2014

Couch Cushions: AKA the Mystery Hole

We had recently bought a new couch, and upon removal of the old one, made the discovery of a life time. When the old couch was flipped up on it's side it made a very interesting noise. The distinct noise of random items falling through couch springs to the side that now laid on the ground. With a quick slit with a razor knife to the fabric on the bottom of the couch I found where all the missing pocket change, small toys, scissors, batteries,  jewelry, crochet hooks, 6 pairs of tweezers (no lie)  and many more tiny objects that had been lost over the past 5 years. How did they get there exactly? I inspected the couch seat itself and discovered that where the back of the couch met the seat was a very small crack that let these small items pass through to the Mystery Hole where they would be forever lost. Determined not to loose any more small treasures and necessities to this obscure menace that was also a feature found on the new couch in addition to the "crack of doom and loss" that apparently is equipped in all sectionals , I set out on a mission to resolve this as easily and cheaply as possible.  And once again, thanks to Restore, the problem has been solved!

I found these 1 inch in diameter 6 ft long foam pipe insulator sleeves at Restore for $.75 each. I simply took my cushions off the couch and wedged the insulators into the tiny trench of terror and crack of doom and loss and then put the cushions back on the couch. After extensive testing over the past 60 days, we have had zero lego or pocket change casualties to the couch monster. Problem solved for less than $2!!

The Resolution of Resolution:

What problem can Habitat's Restore solve for you? Stop by your local Restore and check out all the possibilities they have in stock to fulfil your 2014 Resolutions. By purchasing items from Habitat for Humanity's Restores, you can also put a big check mark beside "being more charitable" because the profits made from Restore are utilized in the many charitable acts that Habitat for Humanity perform in our community and world wide. Share your finds and problem solvers with us here in the comments or posting to their Facebook page:

Tuesday, December 17, 2013

Fishing around for Christmas Inspiration...


With only days left until Christmas, you may be in desperate need of a last minute gift or even a little bit of holiday decor in your own home. This happy little snowman is sure to leave a big impression on your guests and not your wallet.

I came across this peculiar thing at Restore a few months ago for $2.00. It laid down completely flat and took this form when you picked up the handle and has 2 spring doors on either side of the bottom part. Long story short, it was interesting and $2.00 so I brought it home. (I did find out later that it is some kind of fishing trap.) 


So what exactly can you do with an old fish trap thingy? Well, if you combine it with some boxes of ornaments I also got at Restore ranging in price from $1-$4 and a little Christmas magic (that would be 30 minutes of free time in my house) .... 

You can have this super cute guy for Christmas.....


First, fill the fish thingy up with ornaments. When I got to the top section I used floral wire and made an "X" over the top of the ornaments to each side of the top bar to hold them in and to make it keep it's form.

Next I used this ornament as a nose by simply removing the top and then reattaching it through the cage and securing with glue.


I then glued some black buttons for eyes and buttons and glued this hat I picked up at another retail store's dollar section. I added this festive bow and some stick arms from the yard.


And because I absolutely LOVE Christmas lights and have lit up every square inch of my house and yard as well as neighbors' house and yard, I felt that adding a small strand of white LED string lights was the next logical choice to finish him off and pulled them through the body and head. 

The final cost for this one of a kind decoration, $12.


I wish you all a VERY MERRY CHRISTMAS and a Happy New Year! 


Thursday, November 21, 2013

Add some Holiday Cheer to that old clear glass....

So if you're like me, then you probably have an entire cabinet full of clear glassware that despite it's great shapes and lines, it still fits in the "BLAH" category. Well cheer up, because I have a quick and very inexpensive way to transform your plain glass ware from this:


To This:


What you will need:

Clear glass
Mod Podge
Food Coloring
Water
Wax paper
Cookie baking sheet

First, cover your cookie baking sheet with a piece of wax paper and set to the side for later. In a bowl or cup that you will not be coloring, mix Mod Podge and Water and food coloring to desired. I have found that a 2:1 ratio seems to work best (e.i. 2 tablespoons of Mod Podge and 1 tablespoon of water.) I have also found that preparing this in an old tupperware bowl with a lid allows me to keep any left over mix to use later. Remember when adding your food coloring the simple principles we learned back in grade school.... that mixing white with a color will make it lighter. So when adding Duke blue food coloring to the white Mod Podge it will appear to be more like a Carolina blue or even a Panthers teal, but will finish like the jars in behind the green glass shown in the picture above. 

Once you have your mixture prepared, pour it into the glassware and slowly roll it around ensuring that you have covered the entire area. Now pour the excess mixture out and back into your mixing bowl. Flip your glassware upside down and place on the wax papered cookie sheet and let it continue to drain for at least an hour or two. This will help spread the mixture more evenly and help with bubbles. (Bubbles in the bottom of the finished are pretty much inevitable but you can control the size by time spent draining)

Heat your oven to 170 degrees (or the lowest setting your oven offers. Mine only goes to 200.) Once your glassware is done draining, place the cookie sheet in the oven for 15-25 min. (until a more dry appearance is  present, not completely dry but not wet either) and then flip it right side up on the sheet and bake for another 30 min or until completely dry.

Let the piece cool and you are finished.

The best thing about this is that if you are not happy with the color you can recoat to make it deeper or soak it in water over night and the water soluble Mod Podge will dissolve and wash right out. Which brings me to another point, this is not a good choice for glassware you are planning to use for fresh flowers.